Monday, December 8, 2014

I wanna go skating with Willie...

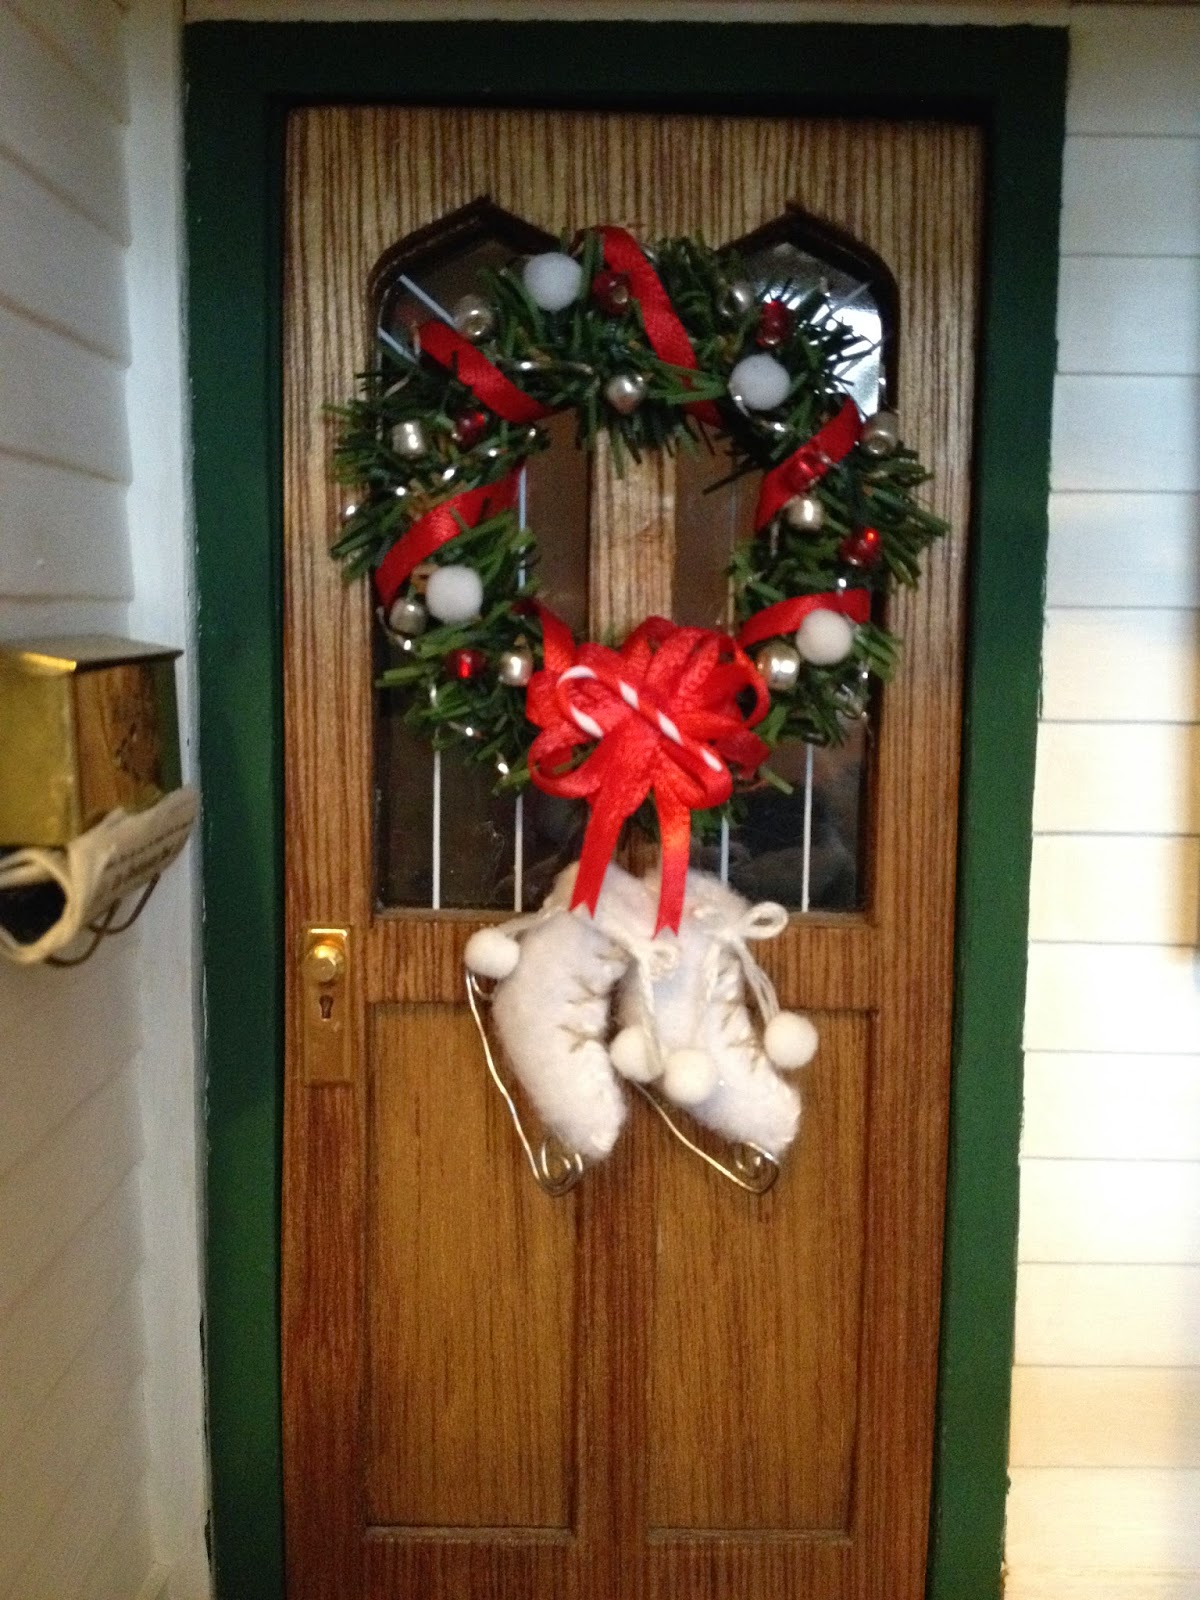
Do you remember that song by Patti Page, I wanna go skating with Willie? I dare you not to sing it while you look at this post. ;)

We all know that there is little that warms my heart more than making Christmas minis... There is just something about this time of year that make me crazy for making little decorations that reflect my big decorations. So sweet, so fun! 

This year I have had such a great response to my current items for sale via my etsy shop, I was inspired to make a new item for this year's inventory. I think it quite possibly may be my favorite mini-made yet... it really is exactly as I pictured it in my head. I hope you enjoy it too!


Can you even stand it?! Because I'm not sure I can!
Everything was handmade 1:12 scale, including the precious little skates. They are especially special because they were modeled after my mom's old skates, complete with pom-pom laces.  They are made of felt, string, poms and a paper clip.

I have now perfected the system and plan to add a cuff of fur to the next pair.


Thank you for taking the time to see my sweetest little obsession. Merry Christmas! xo -Traci


Wednesday, March 5, 2014

For my Toes

Hi dear mini friends! It's been such a long time since I have had the chance to do anything mini... and thus, I have had no time to sit down and blog.

I decided today that I would at least share with you my next "plan" for tiny creating... when I will be able to implement said plan is another story entirely. Moving on.

I am afraid of my attic.  (This blog just took a drastic turn, I know. Bear with me, I will get to my point eventually, I promise.)  There are dust balls and cobwebs and tiny little furry creatures up there...not my idea of a good time.  When my husband and I moved into this home, we were in the process of heavy renovations (like-no-kitchen-for-three-years-kinda-heavy).  As a result, everything that wasn't a matter of necessity was placed in the attic, including *gasp* my miniatures.  As you may know by the creation of this blog, I have since taken my dollhouse out of storage.  But, there was more up there!  And so it was time to buck up and face my fear of the attic, for what was hidden up there is a treasure much too special to remain in storage any longer.

Several years ago my Grandpa "Toes" as I called him, passed away as a result of a tragic car accident.  It was an extremely difficult time for our family... saying goodbye to family is a sorrow that has touched almost all of us in some way. There is no doubt, the loss of our loved ones leaves a footprint of sad permanently on your heart.  Because I am a creative person (though I do much more than miniature for my creative outlet) I began to process this loss in a unique way that many of you will understand.

My grandpa owned a grocery store.  As a young girl, I thought that his owning a grocery store was almost as cool as if he were on tv... two words: FREE CANDY.  :0)  When we would visit my grandpa, he would take my sister and I to his Warehouse Market with him and let us roam free through the aisles of his store.  Oh, how awesome that was!  My favorite aisle was (of course) the candy aisle.  Remember the good ole days when there would be the bins of loose hard candies that you could scoop out and buy by the pound? Yup. That was this then-tiny-hiney's mother load!!  Grandpa knew we would make several trips down that aisle, and he knew that each time we would venture down one or two or twenty of his soft caramels would go missing.  But he never once told us no.  In fact, as a man who always had a piece or two of hard candy stashed in his breast pocket, I am certain he would have been a bit disappointed in his young girls had they not scooped at least a few sweet treats from the bins of his store.

I held on to the sweetness of that particular memory as I said goodbye to a man I love so dearly. And as I began to process the reality of his passing, I knew I needed to honor him as his love always honored me.

When I returned from his services I made a mad dash to The Mixed Bag, which was a wonderful miniature store near my home.  I wandered the store for quite some time, not entirely sure what I was looking for, but knowing that I was looking for something.  And then I saw it.  The perfect way to honor Grandpa Toes! The center section of the Street of Shops was just the right size to do a general store in honor of my Grandpa, the Warehouse Market, and my very special memories of both.

I brought home the kit, and proceeded to work frantically getting it built, mourning the much-too-soon loss of my Grandpa, and relishing in the vivid memories of him it helped me conjur.  It was my very first build without anyone to assist me, and though I struggled a bit, I made my way through it.  I finished the structure just in time to pack it up, move to our "new" home, and store it in the attic for eight years.

Which brings me back to my dusty, musty, mousy attic and a heart determined to finish what I once started... So I put on my big girl shoes, a pair of gloves and rescued my tribute piece from storage.

It is an incomplete project, as just the structure is built.  I have yet to make final decisions on how I want to fill my fun little general store, but I do know this... somewhere within its cozy little walls there will be a section just for candy.  I imagine it will be on a low shelf somewhere, what would be just the right level for a little girl to reach her bitty hand in and take a sweet little treat or two.  For I also can imagine that her Grandpa would be somewhere nearby, watching her unnoticed, with a twinkle in his eye, a smile on his face, and a heart full of love especially for her. 

In Loving Memory, Grandpa "Toes" Thomas J. Killworth.


Wednesday, January 22, 2014

Passing along the craze...

     It is with great joy I share my post with you all today! Here is our story:

     When I had my swap date with miniaturist Jane she told me of a wonderful little find at Michael's Craft stores, Creatology's 3D pop out puzzles... in dollhouse form, for only 7 bucks each!! Needless to say, I drove immediately from our meet and greet to Michaels, only to be very disappointed. These fabulous little kits had been long since discontinued and no matter how many times I searched the aisles of the store, there was not even one little kit to bring home. *sigh* 

     Well, I tend to get a touch obsessive, and so I turned to the internet with a glimmer of hope (I mean what would be a better Christmas gift for my Real Life Little (RLL) than her own dollhouse to design, build, and play with?!)  Thankfully, a nice gal on Ebay had two of the kits, and had only marked the price up by one dollar, and so I said "sold!!!" and our little kits came in the mail the following week.  RLL opened her present and hung her mouth wide open saying, "for me Mommy? I get to have my own dollhouse like yours?" *awwwwwww!*

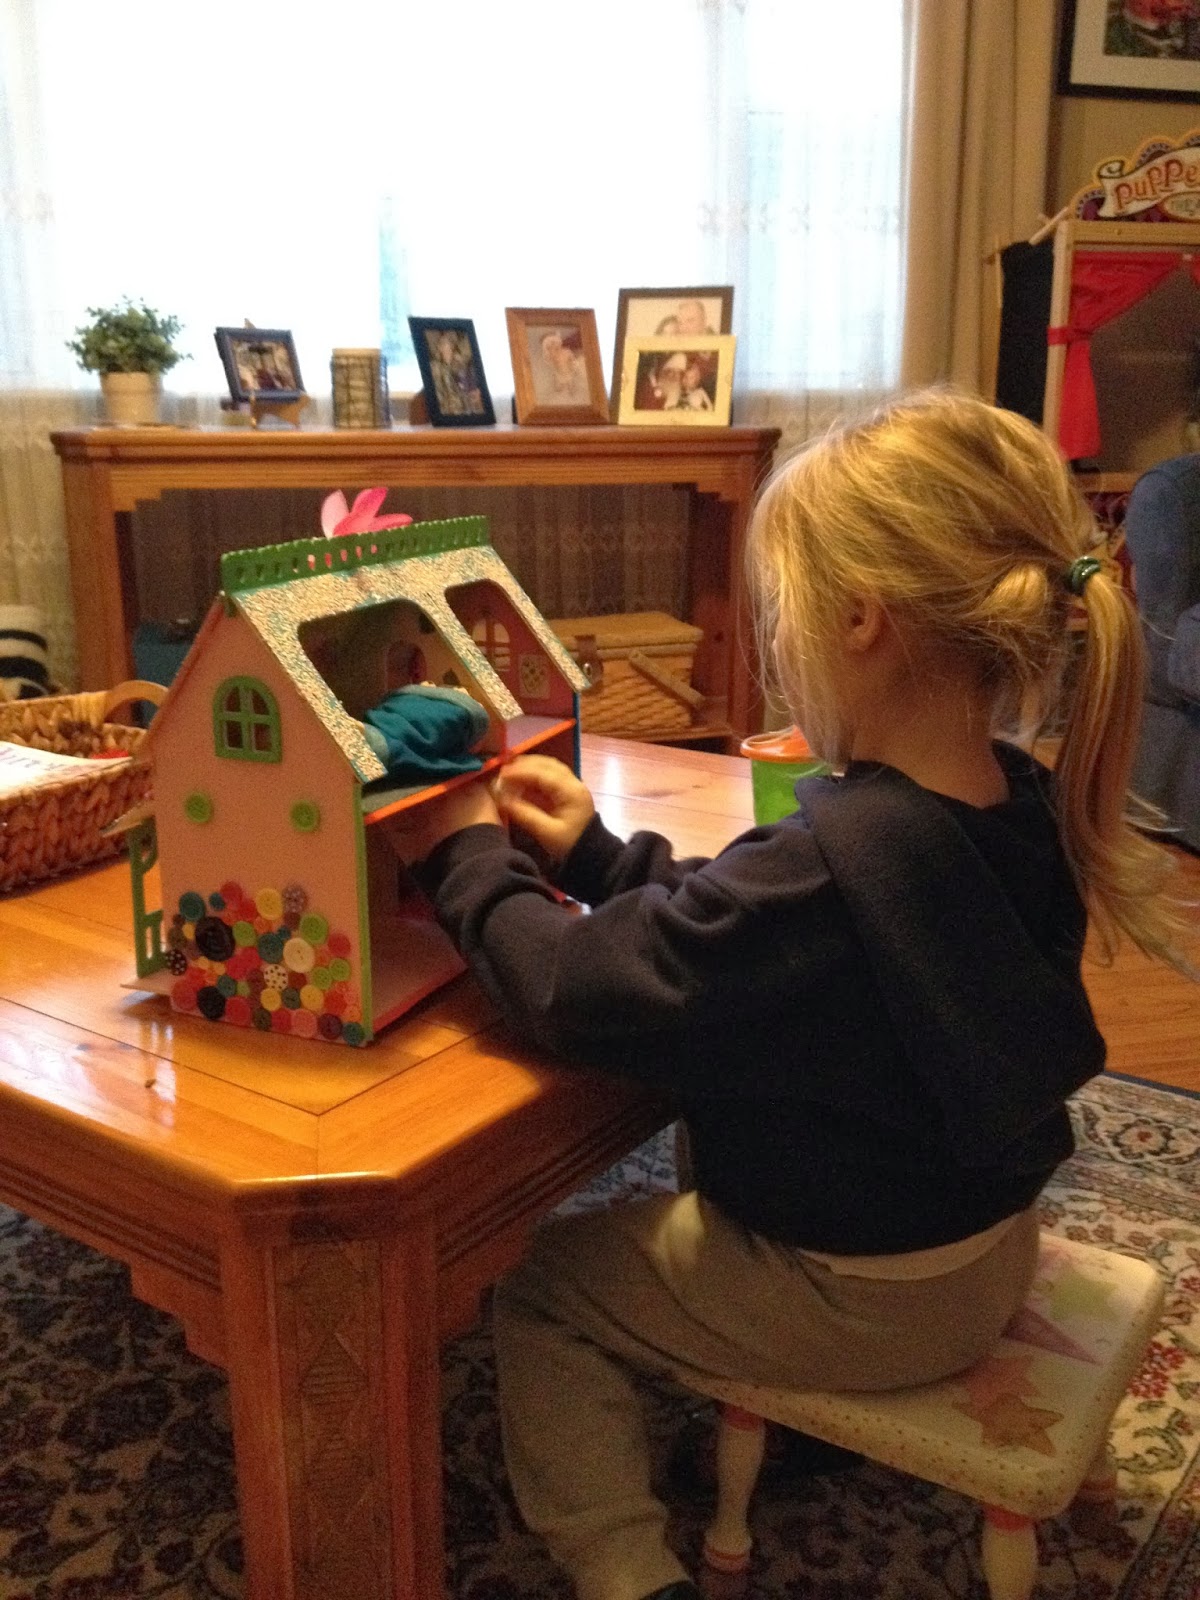
     And so a few weekends later, we sat down to begin our project together.  I do have to tell you that this was an exercise in patience for me... I tend to be a crafter-taker-over-er who wants to have all the control of making creative decisions (it's important to know your weaknesses...) BUT, I managed to swallow my instincts, and give the creative reigns over to my very precious and super creative four-year old.  SHE DID GREAT!!! I am so stinking proud of her, and I just know you will be too!

     She picked all the paint colors, did all of the interior painting herself (mom helped with the exterior paint per her instructions), decided which felt pieces to use for her carpets, made a plan of which little room would be which, made all of the pictures herself (with no input from Mom whatsoever), selected and placed the buttons for the stone walls, decided to add some sparkle to her roof and a beautiful flower, and my absolute favorite: made a clock for her house out of a big button, paper and markers.  She did this awesome little clock completely by herself!  I had no idea what she was making, but glue-and-scissors-and-markers-all-over later, she showed me the most magnificent wall clock "to go in my son's room, Mom." 

Her super awesome clock is on the left of the window.
Original artwork for the walls.


My Real Life Little (4 yrs) and her precious first dollhouse. :)


     And so, the craze continues into another generation.  She could hardly wait as we drove to the toy store to find the perfect little animals to go inside her new little house. We have yet to make furniture, but she has been very creative in improvising for the time being.  Last time I checked in her little house, she had socks for sleeping bags and craft poms for pillows.   She also insisted that I help her make super hero capes out of felt for her little family..."'cuz they are SUPER, mom!" *lol*


     Nothing gives this Momma greater joy than to see her sweet kiddo's mind think "mini."  It truly is wonderful to see this fulfilling and amazing hobby be passed down to our younger generations.  I hope that this is just the beginning of her tiny collection, and that we have many more wonderful experiences like this one to share together.  :)

Blessings to you all and thank you for taking the time to let me gloat! :)

Monday, January 6, 2014

Wow! Is it really 2014?!

I first need to apologize... it feels like a whirlwind of time and space has elapsed before my eyes, I am so sorry I have been MIA for a while.  I pray that your Christmas and Holiday season were as fruitful and blessed as ours. :0)

My temporary hiatus was far from "relaxing" as it was all in part to some very chaotic events.  I had some family emergencies (all is well now), Christmas vacations back West, Holiday parties to plan, new career ventures to start, miniatures for my etsy shop to make...the list could go on. BUT NOW,  finally, some time to blog and catch up! Whew!

So, as I long ago promised, I wanted to share some of the treasures I was fortunate enough to get via a live, IN PERSON swap with miniaturist Jane.   How excited we both were to learn that we were local enough to meet in person!  So we picked a half way point and met up at a library to discuss all things tiny.  Lol, we got "shushed" by the librarian more than once...we were VERY excited to meet!!

Jane is an extremely talented miniaturist.  Her little works are pieces of art.  It was such a privilege to not only get to take home some of her tiny creations, but to ask her questions and learn about her techniques.  She truly spoiled me rotten! (and I'm not complaining!!) :0) These are just a few of my very favorites, but I have more that I will share when I begin blogging about the progress of my Warehouse Market project (more details later).

These little sweets were added to my favorite little home, and they add, yet again, a dimension of reality that just warms my heart.

Can you even stand how adorable this little mouse is?!?  That face!  She hand crafted this little guy from a mold she had made of an orginal she had painstakingly sculpted.  I cannot get over the detail and the beautiful colors that make him look so real. 


This week he has a special little place hiding in my attic by the holiday decorations.  My daughter loves to find his attic hiding spots as it has now become a game of hide and seek.  Mommy hides the mouse, my Little finds the mouse. :0)


And these candles!  I feel in love with these drippy candles when I was admiring Jane's tree house. If you have not seen it, you must! It is one of the most fascinating mini-artworks I have ever seen... and my goal is to see it in person this year. (hint, hint Jane, lol).  These are also handmade of polymer, with just the right amount of detail to make each unique.  Those little wicks just gets me!


As I mentioned, this was just a drop in the bucket of what Jane can do.  It was one of my favorite days ever! There is NOTHING quite as fun as chatting up the tiny with others who appreciate and love it as much (or more) than you do.

Most importantly, I now am blessed to have a new friend in life! :0) I can't wait for our next meet up, and am hoping it gets to happen soon.  Maybe this time we'll be able to chat without being shushed!! (Lol, NOT likely!!)

If you haven't, please, please do yourself a favor and check out Jane's tiny blog by following the link on her name.  But be warned, you won't want to stop looking at all she has done!!! :0) Thank you Jane!!

Sunday, November 24, 2013

My favorite thing...

     Hi there!

     I have much to report on my amazing, awesome, fantastical meeting with my new friend, miniaturist and little-blogger Jane.  That will come in the next blog post, I promise! I have so much I want to say, and just not enough time to actually get it out and posted.  In a nutshell, it was so much fun!  She is wonderful and extremely talented, and I look forward to sharing it all with you very soon.

     In the meantime, I haven't had a chance to work on much (as I mentioned, it's been busy here in my full scale life!), but I did get a quick project that has been on my mind and heart finally completed!

     Here is the background:

     I am a believer in Christ.  He is my personal Savior and provider of all things.  I strive in my life to do all things (including my miniature creations) to glorify Him and His kingdom.

     One of my very favorite things in the entire world is a beautiful, handmade, birch cross that hangs in my living room (the heart of our home).  My husband, who is a non-believer, made it for me in an act of love for Valentine's Day several years ago.  It's beauty and message touch my heart every time I look at it proudly displayed in my home.  I am humbled that it was crafted by the hardworking hands of my amazing husband, and though its message is not the same for him at is for me, I am deeply touched that he loved me enough to make for me one of the most thoughtful gifts I could have ever received.

My real life, handmade, birch cross. <3


     It truly is one of my favorite things.

     Upon the recent reintroduction of my tiny house, I realized that there was one thing that was missing from my favorite little living room... my favorite thing in my real life living room!  So, I asked if my husband would cut me some birch twigs on his next hunting adventure and set out to make a mini-version of my beautiful birch cross.

     This is the end result, and I couldn't be happier.


     I should note, a straight pin will eventually be cut and used as a nail to go in the center of the hanging loop, but I can't find the box of straight pins I know I have somewhere amongst my craft supplies.


     Blessings to you all today and everyday.
     John 3:16

Tuesday, November 19, 2013

Stuffed!

     I think that maybe, just maybe, I have a problem....

     I woke up this morning having dreamt of small things (yup, that's true) and after I had coffee and my morning time with God, I immediately got to work.  I wanted justonemore little goodie to give to my friend at the swap and meet today...  justonemore.

     I have been working on stockings for my mantle, and I just love love LOVE them!! So I decided to whip one up for her holiday shop too.  Lol, I hope she doesn't mind (and of course has my permission to give any of my goodies away if they are not what she was envisioning for her Holiday Inc. creation.)

     So a quick upload of the stuffed little treasure, and then I must go get in the shower! I have a very important date, I can't wait to tell you all about it later. :0) Have a stuffed kind of day today all!


Monday, November 18, 2013

If only it had snowed today....

     I have self-inflicted crossed-eyes tonight, but it was soooo worth it! My darling husband (DH) announced this morning, and I quote "I'll take [Real Life Little] to school today. That way you can, you know, finish whatever all THIS is...." lol, me thinks he has had enough of my "temporary" craft mess taking over my kitchen. Ha!

     Shrugging off his disdain for my tiny (ok, not tiny) creative process, I jumped at the opportunity to stay in my jammies and finish my sweet little Christmas tree. Wooohoooo! Today was the day! Time to decorate!  So I made me some cocoa, added tiny snowballs (marshmallows), and cranked up the Christmas tunes on Pandora... it was time to get to work.

     Some of the trimmings, ornaments, and star were salvaged from my tiny Christmas tree past, a couple ornaments were new to me but had been purchased ages ago when my mom found them on one of her mini-hunts, and I made the tiny candy canes and satin trimming.

     Today was a day that required little caffeine (no shaking allowed) and a daddy to entertain my RLL.  Wooo baby! It was fun, but intense (it takes alot out of you to focus and glue that many little treats onto a yummy little tree.)

     And so, without further adieu, I present to you a Bless-ed Little Tree, complete (almost) in all her glory!  May it honor the One this wonderful holiday is all about. <3

This picture just doesn't do the detail justice! SOO much went onto this tree!

A touch closer to see the detail. I am making just a few more candy canes to make her extra sweet!
    And there you have the beginning of my Christmas Season!  I am so grateful I had this project today... it really helped me put my itch to get out my RL tree to rest, at least until after we have turkey and pie. :0)


O Christmas Tree, O Christmas Tree, how are you so tiny?

     So here is my story... My mom had made me an adorable tree, along with other sweet little Holiday decorations, but through the move cross-country and after years of storage, the tree didn't quite have the "in-all-her-glory" look that a tree celebrating Christ's birth should look, if you know what I mean. (Crushed. It was crushed into bits in case you didn't know what I mean.)   
     Poor little thing, it just broke my heart.  So, I set out to find a replacement that I could salvage the ornaments from my original on, and thought I would have great success (I swear I have seen little trees for the Christmas villages in the stores.)  Wrongo: I found nada.  That's when I decided that I would make my own tree (which actually thrilled me!)

    Here is my process, with a couple of pictures.  I was winging it, so forgive me if it seems a bit scattered:

This is what I used for my branches. Available at Michaels or AC Moore.
      The supplies: Garland, (see above), wooden dowel cut to the proper height for my house (not sure the exact size diameter, but the same as a pencil and short enough to put a base and a star without scraping the ceilings), super de-duper glue (warning, your fingers will not be your biggest fan after this project), scissors that can cut through wire and that you have no sentimental attachment to), and finally the patience of Job, lol.


     I then wrapped the dowel with a layer of the garland. I just twisted it all around it to cover the dowel, but left some of the wood exposed so I would have a place to glue my branches onto (I have a picture below that explains what I mean.)

     Then I started cutting different lengths.  I have a total of 80 branches on my tree. Yup. I like 'em full and fluffy!

Cut the garland into the appropriate tree branch size.
Smaller branches at the top and longer branches at the bottom.
I used a photo of a real tree to eyeball what my little guy was supposed to look like. 


This is the picture that shows what my dowel looked like as I was putting on the branches. 


     I literally eyeballed my branch lengths and placement as I went along.  A tip for the weary: put the glue on the branch, and then the branch on the dowel... saves you a lot of heart ache.

     For my base, I used some scrap poly clay, made a good mound, stuck the bottom of my dowel in and added a weight (mine happens to be a chucky cheese token... oh how mad my Real Life Little would be if she knew!!) :0)

Yes, that is a piece of garland permanently bonded to my finger. It is still there. J/K!


     Bake according to clay directions, but note that you will have to scrape the hole a bit after it comes out of the oven to fit your dowel again.  I waited until I was completely done with my tree before I glued it into my base. I did this so I could better maneuver the tree while putting my garlands and ornaments on (you'll see them in my next post.)

    The skirt is a piece of felt cut (I used a CD for a pattern, perfect size!), with some pretty lace and satin ribbon to trim.  To get the skirt to lay flat, I used my hot embossing tool to warm the felt and stretch it over my base (after I glued the skirt to the base.)  Be warned, the heat of this tool will burn BURN the felt, so use very sparingly.   A little heat, a little stretch and mold, a little heat, a little stretch and mold...


And there she is! A beautiful little tree (I just placed the presents there to get an idea) just waiting for her trimmings.  :0) Stay tuned! They'll be my next post... 

Luck O' the Little...

     Tomorrow is the big day! I get to meet up with my new friend, miniaturist, and little-blogger Jane to swap some goodies!  I showed you the wreath and the leprechaun hat, but I wanted to show you the shillelagh I made to go with it. 

     I am pretty new to the world of polymer clay, so it's not as great as I had envisioned it to be... but, nevertheless, I think it'll represent the Irish well in Jane's gorgeous little holiday shop (click the link to see what I'm talking about.)   I hope she likes it!!


Tuesday, November 12, 2013

Gentlemen and Leprechauns

     So, since last year when I found the most gorgeous, oversized holiday top hat to adorn the top of real life (rl) Christmas tree, I have been obsessed with top hat decor.  I made quite a few different top hats in varying sizes to put around my home to compliment my rl tree.  I have received amazing little top hat ornaments to put on my rl tree.  It's pretty safe to say, when I find a theme I love, I stick to it! lol

     Naturally, I was curious to see if I could bring my top hat theme to the world of mini.  I think there was success!  

    The green top hat is my first attempt.  It is a leprechaun hat for my swap meeting next week with miniaturist and little-blogger Jane.  She is working on a wonderful holiday shop where all the holidays will be represented.  I am going to compliment this adorable little top hat with a shillelagh and pot of gold.  I just had to represent my Irish! :)

     Here are the pictures of the hat:


   Again, I wanted to do a tutorial for you, but since I hadn't made one previously, I thought I would do a couple "testers" first (and also, figure out how to take pictures with only two hands...)

    I have a coat/hat tree in the master bedroom of my cottage.  It is adorned with a gorgeous, Victorian ladies hat (which I like to imagine is for Church and shopping outings.)  Today, my gentleman is represented as well. 

   Here is my traditional, black top hat (The glue wasn't quite dry when I photographed, and is noticeable in the pictures. It won't be once dry.): 


In the master bedroom


Monday, November 11, 2013

Merry Christmas (soon!)

     It is no secret, I love Christmas! There is something magical, wonderful, cozy and sweet about His holiday.  Not only do I love the celebration with family and food, but I love (LOVE) the decorating to prepare for the fun! And my dollhouse is no exception... 
    
     This will be the first year in many that I get to go all out with my Christmas decorations for the little cottage, so I thought adding some new in with my old would be a fun way to get in the spirit. (Like I need any help, lol!)

   I have to be honest, there was an ulterior motive that inspired these two little beauties... next week I get to meet fellow enthusiast and little blogger Jane. Check out her blog by clicking the link on her name.  She is working on a Holiday shop that has me more excited than when the Easter bunny visits! I am just in love with the concept, and couldn't help but make a treat for her wonderful little shop.  As I started working, I realized I might not be able to give it away without making one of my own.

  I tried to do a photo tutorial as I went along, but have to admit, taking pictures AND crafting at the same time is pretty hard.  So I am looking for my tripod and researching how to set the timer on my shutter... next time.

  Here are the super cool and minty sweet Christmas wreaths:


About me (& my first tiny house)


I am so excited to start my very own Dollhouse Miniature Enthusiast blog!! I can't wait to share some of my ideas and projects with you. First, let me tell you a little about myself.
            My name is Traci and I have been a tiny collector since I was 11 years old. It all started when we took our family vacation to Seattle, Washington and on the way stopped at an amazing little German town called Leavenworth.  There, in a little basement store, I stumbled onto a hobby that would become my heart's tiniest desire! Alpen Haus introduced me to the world of tiny, and I spent the rest of our visit begging my parents to let me go back to look at the miniatures in that store.  
Apparently, my mom and dad took notice that I was somewhat obsessed, and so for my eleventh birthday gift that year I was allowed to bring home my very own kit! I remember spending forever picking out which house I would bring home.  I finally settled on a wonderful little Greenleaf kit, the Westville House.
And so began a two-year build that my Mom and I completed together.  The closest mini store near us was an hour and a half away from my town.  Ann's Dollhouse is no longer open, but it was the sweetest little mini store where my mom and I learned building techniques, picked out wallpaper, carpet, furniture, ooo'ed and ahh'ed over adorable accessories, and just plain ole had fun!  Lol, my dad always brought a book for the trips to Ann's, for he knew it was not going to be a quick "drop-in" visit.  Thank goodness Ann's was in the same town as my big sister's college, it made it much easier to convince mom and dad to go for a weekend trip when we had TWO really good excuses to get in the car. ;)
I have to admit, I didn't help with the actual building that much. As mini builders know, they can be quite complicated and always very delicate, so it was best that I played the roll as cheerleader and assistant (also known as human clamp).  I did have little hands, so those came in handy when my mom needed me to reach in hold something while the glue dried.  It was so much fun building that house together!  
            The Westville only had four rooms, plus an attic.  My mom and I decided that we wanted to divide the largest upstairs room to make a nursery and a bathroom, which is what we did.  
After the construction was complete, my mom and I set out to make my little house “home”.  Ohhh, the sweet little things that fill my dollhouse walls!! The most precious of which came from the loving hands of my mom herself.  It brings tears to my eyes to look at all of the special, sweet touches she made for my house and me.  She is has always been a talented artist, crafter and sewer, and her skills are evident all throughout the walls of my littlest home.  She sewed curtains, designed wall décor, made pillows and bedspreads, and so much more.  Each little room has a little bit of my mom present.  It is truly what I love the most about my first tiny house!  
Many moons later, my little dollhouse has made a cross-country journey literally from coast to coast.  It remained in storage (gasp) for quite a few years, and finally, finally after too much time for this enthusiast to endure, I am able to display my prized possession for others to share!  
My sweet little four-year-old daughter adores my dollhouse almost as much as I do, and I look forward to sharing in the experience of building her first home someday.  
And so, the tradition will go on.  Another little enthusiast will share in the excitement of all things tiny, and the hours of sharing the joy together will fill another daughter with so much love that she can’t help but smile at the memories when she sees her own amazing little house!


Dedicated to my Mom, with love.  Thank you Mema. :o)
On display

Front of house (fall decoration)
Back of house

Attic

Nursery
Bathroom

Bedroom


Bedroom hope chest detail

Bedroom dresser drawer detail
Living room

Kitchen
Kitchen table detail